
How to Build a Wet Shave Kit
Congratulations, you’ve taken your first step into the larger world of wet shaving. Wet shaving is awesome, as we can attest, but I can readily admit it can be a bit daunting to figure out where to start.
There are about one million things you seemingly need to buy. All of them claim they’re different but sort of look the same. Moreover, you’re still thinking about the prospect of cutting yourself on that very first shave.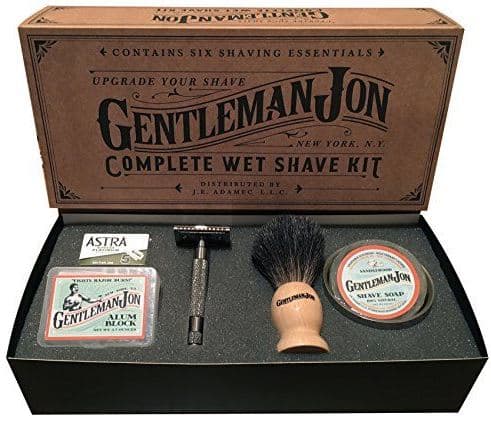
Thankfully, you’ll get a lot of advice on the Internet. Here is our attempt to do the same. Hopefully, by the time you’re done, you’ll have a better inkling of what to get for your first wet shaving experience.
Here is the quick procedure for building a wt shaving kit:
- Pick Your Razor
- Pick Your Blades
- Pick Your Soap
- Pick Your Accessories
- Combine everything into your wet kit
We go into more detail below.
What is Wet Shaving?
We want to fill you in on a little bit of information before we jump into what you will need to have a fully-loaded wet shave kit.
For starters, what is wet shaving?
Well in all reality it is pretty much what it sounds like. Your face will remain wet throughout the entire shave process and you will use a single-blade razor, shaving brush, glycerin-based shaving soap, and a shaving mug to work a lather in. We’ll go into more detail about that later though.
Wet shaving does take a bit longer than your normal shaving routine with a standard or electric t razor, Try to keep that in mind and squeeze the time into your daily routine.
If your grandpa and great-grandpa could fit a shave like this into their day, we are sure you can too.
Why Should I Wet Shave?
Why, indeed? There are some pretty sweet benefits to wet shaving that will probably make you feel a bit better about having to fork over some cash to get your wet shave kit started.
- Save money: Think about how much it cost you the last time you had to buy cartridges for your razor. We are going to bet it was somewhere around $20 or so. That means that you just dropped $2.50 per cartridge. No thanks, man! We would rather spend the 25 cents that the double-edged safety razor cost us. You will also save some coins by using old-school shaving creams and soaps. The chemical loaded stuff that comes in a can will cost you around $5. It doesn’t last all that long and you won’t get the best quality shave with it.

- Environmental impact: When you wet shave you only have a single metal razor blade to dispose of and the paper wrapper or small container that you shave soaps come in. That’s all the waste you have right there. Using disposable razors and canned shaving creams creates much more waste that will just hang out in a landfill.
- Better and smoother shave: There’s nothing like the smooth and consistent shave that you get from a wet shave. Electric and disposable razors are prone to irritating the skin and can leave you with razor burns, ingrown hairs, and redness. Oh and not to mention that the closeness of the shave pales in comparison to one performed with a double-edged safety razor. When you begin wet shaving you will probably notice an immediate change in how your skin looks and feels.
- You’ll feel like a boss: You’re going to be taking part in a ritual that all of the great men in history did. You’ll be kicking it old school just like your grandfather, Harry S. Truman and Ben Franklin.
How to Build a Wet Shave Kit
Now it’s time to toss those expensive disposable razor cartridges and chemical leaden gooey cans of shaving cream!
It’s time that we bring you into the fold of wet shaving and let you know what you’ll need to complete your kit.
Step 1: Pick Your Razor
First things first, you have to pick your razor – this is the cornerstone of your entire wet shave kit.
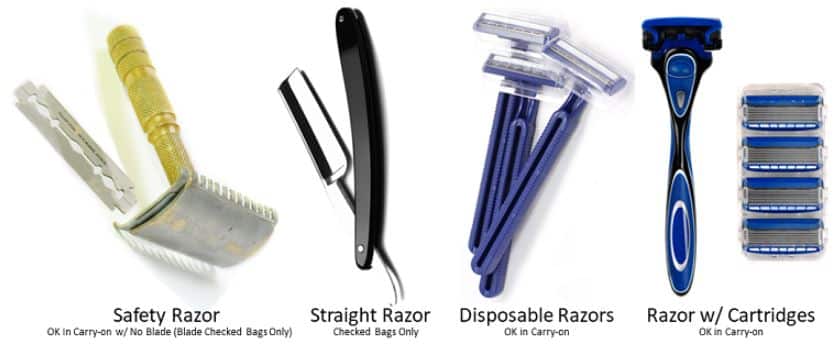
This is the tool that all the other tools are basically there to support, with maybe the exception of the blade (but these go hand-in-hand, so it’s most important to make your first big decision here).
There are a lot of different models out there, all with their own spins on the material – some good brands are Merkur, Edwin Jagger, and even some older Gillettes can be thrown into the mix as well.
[amazon bestseller=”wet shaving razor” items=”3″ template=”table”]
In order to pick the right razor for you, just keep researching and reading up on reviews – decide whether or not you want an open comb (a rounded ‘comb’ on the edge of the razor) or a closed comb, fixed-gap or adjustable (i.e. whether or not you want to be able to change how far the blade sticks out), two-piece or butterfly (i.e. the way you change out razor blades), and more.
This is the hard part, so find the best balance between comfort, price, effectiveness, and closeness of shave, and you’ll be good to go.
Step 2: Pick Your Blades
Once you’ve got the razor picked, it’s time to pick your blades. There isn’t as much variation in blades as there are razors; double edged razor blades, after all, are marketed and designed so that they’ll fit in virtually any DE safety razor.
All the same, there are still slight differences in angle, sharpness, packaging, and price that will make you want to look very closely at which blades work for you.
[amazon bestseller=”wet shaving razor blades” items=”3″ template=”table”]
What we recommend doing is picking up a sample pack – you can try out different kinds of razors from different companies, and see which ones fit your experience best.
That way, when it comes time to order more, you have a better idea of which brand is your favorite.
I honestly can’t recommend sample packs enough (they’re also great for when you forget to buy more of your standard brand and you need backups!).
Here are my picks for a solid starting wet shave kit:
- The Art of Shaving – 4 Elements Starter Kit
- Van Der Hagen Men’s Luxury Shave Set
- Merkur Shaving Gift Set
- Omega 46065 Shaving Set
- Parker 96R Safety Razor Shave Set
Step 3: Pick Your Soap
After you actually figure out the stuff you’re using to scrape facial hair off of you, you’re going to want to look carefully at the lubricant those razor blades will be working against. You’ve basically got two different options – there are shaving soaps and shaving creams.
Shaving creams are pretty much just like the Barbasol can you use to shave with now, but with your wet shave kit, you’ll want to get something that doesn’t come out of an aerosol.
There are plenty of absolutely awesome shaving creams out there that work fantastically, and sometimes don’t even have any air in them to foam up – it’s all just natural oils and herbal ingredients that will treat your face wonderfully.
[amazon bestseller=”wet shaving soap” items=”3″ template=”table”]
Shaving soaps, on the other hand, are a bit more traditional to the wet-shave experience, though you still lather them.
Shaving soaps are great since you get to control the level of lather that goes into them, they are usually healthier for you, and they provide nice lubrication for the razor blade so there are no nicks, cuts, or redness and irritation.
All in all, soaps or creams aside, it’s really up to you, as both of them have their unique benefits.
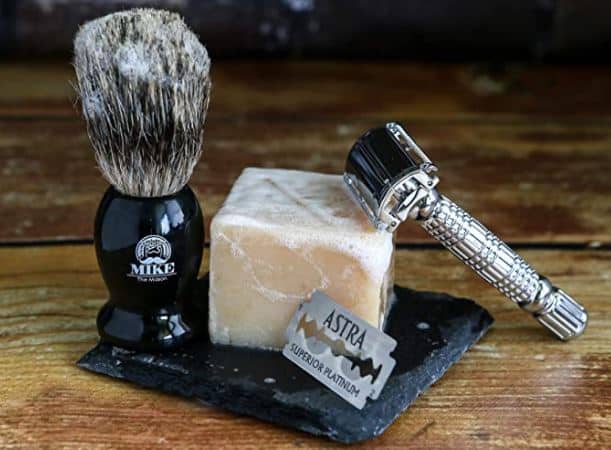
Step 4: Pick Your Accessories
Finally, there’s all the REST of the stuff that will go into your first shave kit build. Perhaps the next most important thing after getting the soap or cream is a shaving brush.
You want to find something that has medium bristles (like horsehair or badger hair), and a comfortable and cool-looking grip on the handle so you can feel good about using it.
After that, there are all manner of other things, like pre-shave and post-shave lotions that will help keep your face healthy before and after the shave itself.
Also, there are shaving mugs and scuttles that give you a nice, perfectly designed receptacle for lathering up your soap or cream with the brush. While you can really use any old thing to do that, the scuttle itself provides an ideal environment, so your lather will go easier.
There’s a lot of other bits and bobs you can invest in if you really want the totally decked-out wet shave kit, but we guarantee these first few steps will get you started with a nice, basic kit in no time at all. Godspeed and good luck!
What Is Needed For A Wet Shave?
Traditionally, wet shaving is done with three primary tools; shaving cream or soap to help soften the hairs, a straight razor or a safety razor and a shaving brush to help create a lather.
How Do You Get The Perfect Wet Shave?
The secret to getting the perfect wet shave is heated. Applying warm water, either from a warm bath or a washcloth or towel dipped in warm water will help pre-soften the beard hairs and bristles as well as the skin underneath, making it easier for the razor to cut through with little resistance and less abrasion.
How Long Should It Take To Wet Shave?
A wet shave should not take more than thirty minutes. It can be done in five minutes if in a rush, but for shavers who like to take their time and enjoy shaving for the best results, fifteen to thirty minutes does magic.
Is Wet Shaving Good For Skin?
Wet shaving, when done properly, helps reduce skin damage from abrasion, blade friction and dryness. Wet shaving softens facial hair, which means less pulling, closer shaving, and a smoother face.
Conclusion
If you’re unsure about wt shaving, let me reassure you that you’re not alone; that happens to everyone early on. However, once you get past all the skittishness and trepidation that goes into wet shaving, you can easily build your first kit.


